On a Forefront TMG server deployment what are the best practice for NIC configuration that's what we will try to discuss about in this article.
First of all in order to make the difference between the NICs it' recommended to rename them as below:
- For the NIC connected to the LAN network: Internal
- For the NIC connected to the Internet network: External
- For the NIC connected to the DMZ network: Perimeter
 It's not recommended to disable the IPv6 protocol on the NIC.
 I/ Internal NIC
Click on Start / Control Panel / Network and Internet / Network and Sharing Center / Change adapter settings
- Select the NIC connected to the LAN
- Replace the name by Internal
- Open the properties of the Internal NIC
- Disable « File and Printer Sharing for Microsoft Network »
- Select IPv4 then Properties.
- Enable Use the following IP address:
- IP address : 192.168.xyz.abc
- Subnet mask : 255.255.255.0
- Default gateway : None
 No gateway must be indicated, indeed several gateways on the NIC is not supported on Windows Server.
In order to communicate with the internal network, into an elevated command prompt execute this following command:
route add network_address MASK network_mask default_gateway -p
- Enable Use the following DNS server addresses:
- Preferred DNS server: 192.168.xyz.ab
- Alternate DNS server: 192.168.xyz.cd
- Click on Advanced
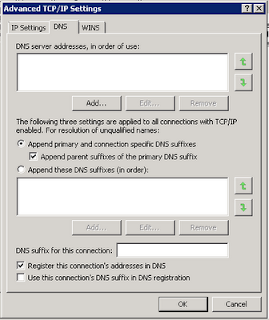
- On the DNS tab enable:
- Append primary and connection specific DNS suffixes
- Append parent suffixes of the primary DNS suffix
- Register this connection’s addresses in DNS
Click on Start / Control Panel / Network and Internet / Network and Sharing Center / Change adapter settings
- Select the NIC connected to the Internet
- Replace the name by External
- Open the properties of the External NIC
- Disable « Client for Microsoft Network »
- Disable « File and Printer Sharing for Microsoft Network »
- Select IPv4 then Properties.
- Enable Use the following IP address :
- IP address : 192.168.xyz.abc
- Subnet mask : 255.255.255.0
- Default gateway : 192.168.xyz.abc
 No DNS server must be indicated.
Indeed using DNS servers on the External interface could raise performance issue for DirectAccess. Moreover the internal name couldn't be resolved, so the internal DNS servers could also be able to resolve Internet FQDN (Fully Qualified Domain Name).
- Click on Advanced
- On the DNS tab:
- Enable « Append primary and connection specific DNS suffixes »
- Enable « Append parent suffixes of the primary DNS suffix »
- Disable « Register this connection’s addresses in DNS »
- On the WINS tab select:
- Disable NetBIOS over TCP/IP
III/ DMZ NIC
Click on Start / Control Panel / Network and Internet / Network and Sharing Center / Change adapter settings
- Select the NIC connected to the DMZ
- Replace the name by Perimeter
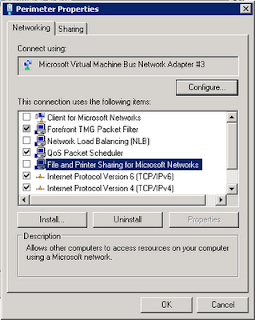
- Open the properties of the Perimeter
- Disable « Client for Microsoft Network »
- Disable « File and Printer Sharing for Microsoft Network »
- Select IPv4 then Properties.
- Enable Use the following IP address:
- IP address: 192.168.xyz.abc
- Subnet mask: 255.255.255.0
- Default gateway: None
 No default gateway and DNS server must be indicated.
 - Click on Advanced
- On the DNS tab disable « Register this connection’s addresses in DNS »
- On the WINS tab select:
- Disable NetBIOS over TCP/IP
You can open the Network Connections by entering « ncpa.cpl » in the Start search box.
On the « Advanced » menu select « Advanced Settings … »
Modify the connections order as follow:
- Internal
- Perimeter
- External
- [Remote Access connections]


Aucun commentaire:
Enregistrer un commentaire